Basic Structure of Computer

Computer Science

All types of computers follow a same basic logical structure and perform the following five basic operations for converting raw input data into information useful to their users.

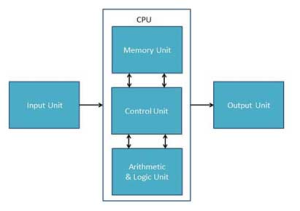
Following diagram shows the basic structure of Computer:

Basic structure

Input Unit

This unit contains devices with the help of which we enter data into computer. This unit makes link between user and computer. The input devices translate the information into the form understandable by computer.

CPU (Central Processing Unit)

CPU is considered as the brain of the computer. CPU performs all types of data processing operations. It stores data, intermediate results and instructions(program). It controls the operation of all parts of computer.

CPU itself has following three components

  • ALU(Arithmetic Logic Unit)
  • Memory Unit
  • Control Unit

Output Unit

Output unit consists of devices with the help of which we get the information from computer. This unit is a link between computer and users. Output…

View original post 104 more words

How to Fix Render-Blocking JavaScript and CSS in WordPress

Do you want to eliminate render-blocking JavaScript and CSS in WordPress? If you test your website on Google PageSpeed insights, then you will likely see a suggestion to eliminate render-blocking scrips and CSS. In this article, we will show you how to easily fix render blocking JavaScript and CSS in WordPress to improve your Google PageSpeed score.

How to fix render blocking JavaScript and CSS in WordPress

What is Render-Blocking JavaScript and CSS?

Every WordPress site has a theme and plugins that add JavaScript and CSS files to the front-end of your website. These scripts can increase your site’s page load time, and they can also block rendering of the page.

A user’s browser will have to load those scripts and CSS before loading rest of the HTML on the page. This means that users on a slower connection will have to wait a few milliseconds more to see the page.

These scripts and stylesheets are referred to as render-blocking JavaScript and CSS.

Website owners who are trying to achieve the Google PageSpeed score of 100 will need to fix this issue to attain that perfect score.

What is Google PageSpeed Score?

Google PageSpeed Insights is an online tool created by Google to help website owners optimize and test their websites. This tool tests your website against Google’s guidelines for speed and offers suggestions to improve your site’s page load time.

It shows you a score based on the number of rules that your site passes. Most websites get somewhere between 50-70. However, some website owners feel compelled to achieve 100 (the highest a page can score).

Do You Really Need the Perfect “100” Google PageSpeed Score?

The purpose of Google PageSpeed insights is to provide you guidelines to improve speed and performance of your website. You are not required to follow these rules strictly.

Remember that speed is only one of the many SEO metrics that help Google determine how to rank your website. The reason speed is so important is because it improves user experience on your site.

A better user experience requires a lot more than just speed. You also need to offer useful information, better user interface, and engaging content with text, images, and videos.

Your goal should be to create a fast website that offers great user experience.

We recently redesigned WPBeginner, and we kept our focus on speed as well as improving user experience.

We recommend that you use Google Pagespeed rules as suggestions, and if you can implement them easily without ruining user experience, then that’s great. Otherwise, you should strive to do as much as you can and then don’t worry about the rest.

Having said that, let’s take a look at what you can do to fix render blocking JavaScript and CSS in WordPress.

We will cover two methods that will fix the render blocking JavaScript and CSS in WordPress. You can choose the one that works best for your website.

1. Fix Render Blocking Scripts and CSS with Autoptimize

This method is simpler and recommended for most users.

First thing you need to do is install and activate the Autoptimize plugin. For more details, see our step by step guide on how to install a WordPress plugin.

Upon activation, you need to visit the Settings » Autoptimize page to configure the plugin settings.

Autoptimize Settings

You can start by checking the box next to JavaScript Options and CSS Options and then click on the save changes button.

You can now test your website using PageSpeed tool. If there are still render blocking scripts, then you need to come back to the plugin’s settings page and click on ‘Show Advanced Settings’ button at the top.

Advanced JavaScript Options

Here you can allow plugin to include inline JS and remove scripts that are excluded by default like seal.js or jquery.js.

Next, scroll down to CSS option and allow plugin to aggregate inline CSS.

Click on the ‘Save changes and Empty Cache’ button to save your changes and empty plugin cache.

Once you are done, go ahead and check your website again with the PageSpeed tool.

Make sure that you thoroughly test your website to see that nothing is broken by optimizing your JavaScripts or CSS.

How does it work?

Autoptimize aggregates all enqueued JavaScript and CSS. After that, it creates minified CSS and JavaScripts files and serves cached copies to your website as async or deferred.

This allows you to fix the render blocking scripts and styles issue. However, please keep in mind that it can also affect the performance or appearance of your website.

2. Fix Render Blocking JavaScript using W3 Total Cache

This method requires a little more work and is recommended for users already using W3 Total Cache plugin on their website.

First you will need to install and activate the W3 Total Cache plugin. If you need help, then see our guide on how to install and setup W3 Total Cache for Beginners.

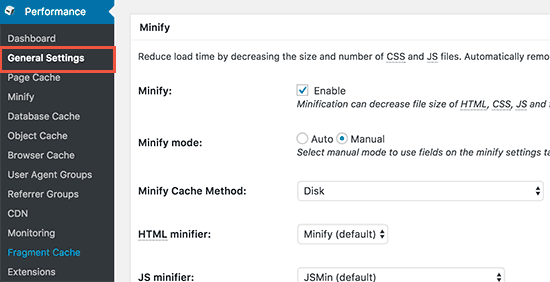
Next, you need to visit Performance » General Settings page and scroll down to Minify section.

W3 Total Cache enable minify

First you need to check ‘Enable’ next to Minify option and then select ‘Manual’ for minify mode option.

Click on the save all settings button to store your settings.

Next, you need to add the scripts and CSS that you want to minify.

You can get the URLs of all the scripts and stylesheets that are render blocking from Google PageSpeed Insights tool.

Under the suggestions where it says: ‘Eliminate render-blocking JavaScript and CSS in above-the-fold content’, click on ‘Show how to fix’. It will show you the list of scripts and stylesheets.

Get JavaScript and Stylesheet URLs from Google PageSpeed tool

Take your mouse over to a script and it will show you the full URL. You can select this URL and then use your keyboard’s CTRL+C (Command+C on Mac) keys to copy the URL.

Now head over to your WordPress admin area and go to Performance » Minify page.

First you need to add JavaScript files that you want to be minified. Scroll down to JS section and then under the ‘Operations in areas’ set the embed type to ‘Non-blocking async’ for the <head> section.

Add scripts to minify

Next, you need to click on the ‘Add script’ button and then start adding script URLs that you copied from Google PageSpeed tool.

Once you are done, scroll down to CSS section and then click on the ‘Add a stylesheet’ button. Now start adding stylesheet URLs you copied from Google PageSpeed tool.

Add stylesheets to minify

Now click on the ‘Save settings and purge cache’ button to store your settings.

Visit the Google PageSpeed tool and test your website again.

Make sure that you also test your website thoroughly to see that everything is working fine.

Troubleshooting

Depending on how the plugins and your WordPress themes uses JavaScript and CSS, it could be quite challenging to completely fix all render blocking JavaScript and CSS issues.

While the above tools can help, your plugins may need certain scripts at a different priority level to work properly. In that case, the above solutions can break your plugins or they could behave unexpectedly.

Google may still show you certain issues like optimizing CSS delivery for above the fold content. Autoptimize allows you to fix that by manually adding inline CSS required to display the above fold area of your theme.

However, it could be quite difficult to find out what CSS code you will need to display above the fold content.

That’s all, we hope this article helped you learn how to fix render blocking JavaScript and CSS in WordPress.

How to Disable Trackbacks and Pings on Existing WordPress Posts

Do you want to disable trackbacks and pings on your old WordPress posts? Trackbacks and pingbacks allow blogs to notify each other that they have linked to a post. However, today it is mainly used by spammers to send trackbacks from spam websites. In this article, we will show you how to disable trackbacks and pings on existing WordPress posts.

How to Disable Trackbacks and Pings on Existing WordPress Posts

Why Disable Trackbacks and Pings in WordPress?

In the early days of blogging, trackbacks and pingbacks were introduced as a way for blogs to notify each other about links.

Let’s suppose you write an article and add a link to a post on your friend’s blog. Your blog will then automatically send a ping to their blog.

This pingback will then appear in their blog’s comment moderation queue with a link to your website.

However, today this feature is mostly used by spammers to send thousands of fake trackbacks and pings. Even if you are using Akismet, some of these trackbacks may still get into your moderation queue.

WordPress allows you to turn off this feature. You can do that by going toSettings » Discussion page and then uncheck the box next to ‘Allow link notifications from other blogs (pingbacks and trackbacks) on new articles’option.

Disable pings on all new articles

However, it only turns them off on any new articles that you publish. All your old posts will still have trackbacks and pingbacks enabled. WordPress will even add trackbacks to those posts whenever you link them on your own blog. See our guide on how to disable self pingbacks in WordPress.

Let’s take a look at how to easily disable trackbacks and pings on existing WordPress posts.

Disable Trackbacks and Pings for WordPress Posts

First you need to visit Posts » All Posts page and then click on the Screen Options button at the top right corner of the screen.

Show more posts per page

Now enter 999 next to ‘Number of items per page’ option and then click on apply button.

This will reload the post’s list, and it will now show upto 999 posts on the same page.

Next, you need to select all posts by checking the box next to title label.

Select all posts on the page

After that you need to select ‘Edit’ from Bulk Actions drop down and click on the ‘Apply’ button.

Bulk edit all selected posts

WordPress will now show you a bulk edit box with all posts on the page selected.

In the bulk edit box, you need to look for the pings option and then change it to ‘Do not allow’.

Do not allow pings

Next, you just need to click on the update button to save your changes.

WordPress will now update and turn off pings on all selected posts.

If you have more than 999 posts on your WordPress site, then you need to go to the next page and repeat the process.

We hope this article helped you learn how to easily disable trackbacks and pings on existing WordPress posts.

The Ultimate Guide to Boost WordPress Speed & Performance

Do you want to speed up your WordPress site? Fast loading pages improve user experience, increase your pageviews, and help with your WordPress SEO. In this article, we will share the most useful WordPress speed optimization tips to boost WordPress performance and speed up your website.

Speed up WordPress - Ultimate Guide

Unlike other “X best WordPress caching plugin” lists or generic “X tips to speeding up WordPress” tutorials, this article is a comprehensive guide to WordPress performance optimization.

We include everything from why speed is important, what slows down your WordPress site to actionable steps that you can take to improve your WordPress speed immediately.

To make it easy, we have created a table of contents to help you navigate through our ultimate guide to speeding up your WordPress site.

Table of Contents

Basics of WordPress Performance

Speeding Up WordPress in Easy Steps (No Coding)

WordPress Performance Optimization Best Practices

Fine-Tuning WordPress for Speed (Advanced)

Why Speed is Important for Your WordPress Site?

Studies show that from 2000 to 2016, the average human attention span has dropped from 12 seconds to 7 seconds.

What does this mean for you as a website owner?

You have very little time to show users your content and convince them to stay on your website.

A slow website means users will potentially leave your website before it even loads.

According to a StrangeLoop case study that involved Amazon, Google, and other larger sites, a 1 second delay in page load time can lead to 7% loss in conversions, 11% fewer page views, and 16% decrease in customer satisfaction.

How slow websites cost you money

On top of that, Google and other search engines have already started penalizing slower websites by pushing them down in the search results which means lower traffic for slow websites.

To sum it all up, if you want more traffic, subscribers, and revenue from your website, then you must make your WordPress website FAST!

How to Check Your WordPress Website Speed?

Often beginners think that their website is OK just because it doesn’t feel slow on their computer. That’s a HUGE mistake.

Since you frequently visit your own website, modern browsers like Chrome store your website in cache and automatically prefetch it as soon as you start typing an address. This makes your website load almost instantly.

However, a normal user who is visiting your website for the first time may not have the same experience.

In fact, users in different geographical locations will have a completely different experience.

This is why we recommend that you test your website speed using a tool like Pingdom.

It is a free online tool that allows you to test your website’s speed from different locations.

Pingdom site speed tool

After you run your website speed test, you might be wondering what’s a good website speed that I should aim for?

A good page load time is under 2 seconds.

However, the faster you can make it, the better it is. A few milliseconds of improvements here and there can add up to shaving off half or even a full second from your load time.

[Back to Top ↑]

What Slows Down Your WordPress Website?

Your speed test report will likely have multiple recommendations for improvement. However most of that is technical jargon which is hard for beginners to understand.

However understanding what slows down your website is key to improving performance and making smarter long-term decisions.

The primary causes for a slow WordPress website are:

  • Web Hosting – When your web hosting server is not properly configured it can hurt your website speed.
  • WordPress Configuration – If your WordPress site is not serving cached pages, then it will overload your server thus causing your website to be slow or crash entirely.
  • Page Size – Mainly images that aren’t optimized for web.
  • Bad Plugins – If you’re using a poorly coded plugin, then it can significantly slow down your website.
  • External scripts – External scripts such as ads, font loaders, etc can also have a huge impact on your website performance.

Now that you know what slows down your WordPress website, let’s take a look at how to speed up your WordPress website.

Importance of Good WordPress Hosting

Your WordPress hosting service plays an important role in website performance. A good shared hosting provider like BlueHost or Siteground take the extra measures to optimize your website for performance.

However, on shared hosting you share the server resources with many other customers. This means that if your neighboring site gets a lot of traffic, then it can impact the entire server performance which in turn will slow down your website.

On the other hand, using a managed WordPress hosting service give you the most optimized server configurations to run WordPress. Managed WordPress hosting companies also offer automatic backups, automatic WordPress updates, and more advanced security configurations to protect your website.

We recommend WPEngine as our preferred managed WordPress hosting provider. They’re also the most popular one in the industry. (See our special WPEngine coupon).

For enterprise WordPress hosting, we recommend using Pagely because they’re the best in business.

[Back to Top ↑]

Speeding Up WordPress in Easy Steps (No Coding)

We know that making changes to your website configuration can be a terrifying thought for beginners, especially if you’re not a tech-geek.

But don’t worry, you’re not alone. We have helped thousands of WordPress users improve their WordPress performance.

We will show you how you can speed up your WordPress site with just a few clicks (no coding required).

If you can point-and-click, you can do this!

Install a WordPress Caching Plugin

WordPress pages are “dynamic.” This means they’re built on the fly every time someone visits a post or page on your website. To build your pages, WordPress has to run a process to find the required information, put it all together, and then display it to your user.

This process involves a lot of steps, and it can really slow down your website when you have multiple people visiting your site at once.

That’s why we recommend every WordPress site use a caching plugin. Caching can make your WordPress site anywhere from 2x to 5x faster.

Here’s how it works: Instead of going through the whole page generation process every time, your caching plugin makes a copy of the page after the first load, and then serves that cached version to every subsequent user.

How caching works

As you can see in the graphics above, when a user visits your WordPress site, which is built using PHP, your server retrieves information from a MySQL database and your PHP files, and then it’s all put together into a HTML content which is served served to the user. It’s a long process, but you can skip a lot of it when you use caching instead.

There are a lot of caching plugins available for WordPress, but we recommend using the WP Super Cache plugin. Check out our step by step guide on how to install and setup WP Super Cache on your WordPress site. It’s not difficult to set up, and your visitors will notice the difference.

Note: If you’re using a managed WordPress hosting provider, then you don’t need a caching plugin because they take care of it for you.

[Back to Top ↑]

Optimize Images for Speed

Optimize images for the web

Images bring life to your content and help boost engagement. Researchers have found that using colored visuals makes people 80% more likely to read your content.

But if your images aren’t optimized, they could be hurting more than helping. In fact, non-optimized images are one of the most common speed issues we see on beginner websites.

Before you upload a photo directly from your phone or camera, we recommend that you use photo editing software to optimize your images for web.

In their original formats, these photos can have huge file sizes. But based on the image file format and the compression you choose in your editing software, you can decrease your image size by up to 5x.

At WPBeginner, we only use two image formats: JPEG and PNG.

Now you might be wondering: what’s the difference?

Well, PNG image format is uncompressed. When you compress an image it loses some information, so an uncompressed image will be higher quality with more detail. The downside is that it’s a larger file size, so it takes longer to load.

JPEG, on the other hand, is a compressed file format which slightly reduces image quality, but it’s significantly smaller in size.

So how do we decide which image format to choose?

  • If our photo or image has a lot of different colors, then we use JPEG.
  • If it’s a simpler image or we need a transparent image, then we use PNG.

The majority of our images are JPEGs.

Below is a comparison chart of the file sizes and different compression tool that we could have used for the StrangeLoop image used above.

Image Speed Chart

As you can see in the chart, the image format you use can make a HUGE difference on your website performance.

For details on exactly how to optimize your images using Photoshop and other popular editing tools, without sacrificing quality, see our step by step guide on how to save images optimized for web.

[Back to Top ↑]

WordPress Performance Optimization Best Practices

After installing a caching plugin and optimizing your images, you’ll notice your site will start loading a lot faster.

But if you really want to keep your website as fast as possible, you’ll need to use the best practices listed below.

These tips aren’t too technical, so you don’t need to know any code to implement them. But using them will prevent common problems that will slow down your website.

Keep Your WordPress Site Updated

Keep your WordPress site up to date

As a well maintained open source project, WordPress is updated frequently. Each update will not only offer new features, but also fix security issues and bugs. Your WordPress theme and plugins may have regular updates, too.

As a website owner, it’s your responsibility to keep your WordPress site, theme, and plugins updated to the latest versions. Not doing so may make your site slow and unreliable, and make you vulnerable to security threats.

For more details on the importance of updates, see our article on why you should always use the latest WordPress version.

[Back to Top ↑]

Use Excerpts on Homepage and Archives

Using excerpts

By default, WordPress displays the full content of each article on your homepage and archives. This means your homepage, categories, tags, and other archive pages will all load slower.

Another disadvantage of showing full articles on these pages is that users don’t feel the need to visit the actual article. This can reduces your pageviews, and the time your users spend on your site.

In order to speed up your loading times for archive pages, you can set your site to display excerpts instead of the full content.

You can navigate to Settings » Reading and select “For each article in a feed, show: Summary” instead of “Full Text.”

Display excerpts instead of full text to boost WordPress speed

For more details on the pros and cons of displaying summaries, see our article on full post vs summary (excerpt) in your WordPress archive pages.

[Back to Top ↑]

Split Comments into Pages

Paginated comments

Getting lots of comments on your blog posts? Congratulations! That’s a great indicator of an engaged audience.

But the downside is, loading all those comments can impact your site’s speed.

WordPress comes with a built-in solution for that. Simply go to Settings » Discussion and check the box next to the “Break comments into pages” option.

Break comments into pages in WordPress

For more detailed instructions, see our guide on how to paginate comments in WordPress.

[Back to Top ↑]

Use a Content Delivery Network (CDN)

Remember how we mentioned above that users in different geographical locations may experience different loading times on your site?

That’s because the location of your web hosting servers can have an impact on your site speed. For example, let’s say your web hosting company has its servers in the United States. A visitor who’s also in the United States will generally see faster loading times than a visitor in India.

Using a CDN, or Content Delivery Network, can help to speed up loading times for all of your visitors.

A CDN is a network made up of servers all around the world. Each server will store “static” files used to make up your website. Static files are unchanging files such as images, CSS, and JavaScript, unlike your WordPress pages which are “dynamic” as explained above.

When you use a CDN, every time a user visits your website they are served those static files from whichever server is closest to them. Your own web hosting server will also be faster since the CDN is doing a lot of the work.

You can see how it works in this infographic.

What is a CDN

We use MaxCDN on all our projects, including here on WPBeginner. It works well with WordPress websites and complements your existing WordPress caching plugins for even faster loading times. See our guide on how to install and setup WordPress CDN solution MaxCDN to get started.

[Back to Top ↑]

Don’t Upload Videos Directly to WordPress

YouTube

You can directly upload videos to your WordPress site, and it will automatically display them in an HTML5 player…

But you should NEVER do that!

Hosting videos will cost you bandwidth. You could be charged overage fees by your web hosting company, or they may even shut down your site altogether, even if your plan includes “unlimited” bandwidth.

Hosting videos also increases your backup sizes tremendously, and makes it difficult for you to restore WordPress from backup.

Instead, you should use a video hosting service like YouTube, Vimeo, DailyMotion, etc., and let them take care of the hard work. They have the bandwidth for it!

WordPress has a built-in video embed feature, so you can copy and paste your video’s URL directly into your post and it will embed automatically.

Find out more details on how it works in our guide on embedding videos in WordPress.

[Back to Top ↑]

Use a Theme Optimized For Speed

Choosing a theme optimized for speed

When selecting a WordPress theme for your website, it’s important to pay special attention to speed optimization. Some beautiful and impressive-looking themes are actually poorly coded and can slow your site way down.

It’s usually better to go with a simpler theme and use quality plugins to get the features you need, than to choose a theme that’s bloated with complex layouts, flashy animations, and other unnecessary features.

Premium WordPress theme shops like StudioPress, Themify, and Array Themes offer themes that are well coded and optimized for speed. You can also check out our article on selecting the perfect WordPress theme for advice on what to look for.

Before you activate your new theme, see our guide on how to properly switch your WordPress theme for a smooth transition.

[Back to Top ↑]

Use a Faster Slider Plugin

Faster slider

Sliders are another common web design element that can make your website slow.

Even if your images are all optimized as described above, a poorly coded slider plugin will mean all your work is wasted.

We compared the best WordPress slider plugins for performance and features, and Soliloquy was the fastest by far.

Here’s how it compares to other popular slider plugins.

Slider Plugin Page Load time Requests Page size
Soliloquy 1.34 secs 26 945 KB
Nivo Slider 2.12 secs 29 1 MB
Meteor 2.32 secs 27 1.2 MB
Revolution Slider 2.25 secs 29 1 MB
LayerSlider 2.12 secs 30 975 KB

[Back to Top ↑]

Use a Faster Gallery Plugin

If you have a photography website or a portfolio, then you’ll probably want to use an image gallery plugin to display your photos.

It’s really important that you use a WordPress gallery plugin that is optimized for speed.

We recommend using Envira Gallery, which is the best WordPress gallery plugin in the market. It allows you to create beautiful image galleries that are lightning fast to load.

We tested its speed compared to a couple of other popular gallery plugins, and found that Envira Galley is almost twice as fast:

Gallery Plugin Page Load time Requests Page size
Envira Gallery 1.08 secs 24 1MB
Foo Gallery 1.89 secs 23 357.1KB
NextGEN 1.88 secs 33 518KB

[Back to Top ↑]

Fine-Tuning WordPress for Speed (Advanced)

By using the WordPress optimization best practices and basic speed tips listed above, you should see a big improvement in your site’s loading times.

But every fraction of a second counts. If you want to get the very fastest speed possible, you’ll need to make a few more changes.

The following tips are a little more technical, with some requiring you to modify your site files or have a basic understanding of PHP. You’ll want to make sure to backup your site first just in case.

Split Long Posts into Pages

Split long posts into pages

Readers tend to love blog posts that are longer and more in-depth. Longer posts even tend to rank higher in search engines.

But if you’re publishing long form articles with lots of images, it could be hurting your loading times.

Instead, consider splitting up your longer posts into multiple pages.

WordPress comes with built-in functionality to do that. Simply add the <!––nextpage––> tag in your article where you want to split it into next page. Do that again if you want to split the article on to the next page as well.

For more detailed instructions, see our tutorial on post pagination – how to split WordPress posts into multiple pages.

[Back to Top ↑]

Reduce External HTTP Requests

Cross domain http requests

Many WordPress plugins and themes load all kinds of files from other websites. These files can include scripts, stylesheets, and images from external resources like Google, Facebook, analytics services, and so on.

It’s ok to use a few of these. Many of these files are optimized to load as quickly as possible, so it’s faster than hosting them on your own website.

But if your plugins are making a lot of these requests, then it could slow down your website significantly.

You can reduce all these external HTTP requests by disabling scripts and styles or merging them into one file. Here’s a tutorial on how to disable your plugins’ CSS files and JavaScript.

[Back to Top ↑]

Reduce Database Calls

WordPress database calls

Note: This step is a little more technical and will require basic knowledge of PHP and WordPress template files.

Unfortunately, there are a lot of poorly coded WordPress themes out there. They ignore WordPress standard practices and end up making direct database calls, or too many unnecessary requests to the database. This can really slow down your server by giving it too much work to do.

Even well-coded themes can have code that makes database calls just to get your blog’s basic information.

In this example, every time you see <?php, that’s the start of a new database call:

<html xmlns="http://www.w3.org/1999/xhtml" dir="<?php language_attributes(); ?>">
<head profile="http://gmpg.org/xfn/11">
<meta http-equiv="Content-Type" content="<?php bloginfo('html_type'); ?> 
charset=<?php bloginfo('charset'); ?>" />

You can’t blame theme developers for that. They simply have no other way to find out what language your site is in.

But if you are customizing your site using a child theme, then you can replace these database calls with your specific information in order to reduce all those database calls.

<html xmlns="http://www.w3.org/1999/xhtml" dir="ltr">
<head profile="http://gmpg.org/xfn/11">
<meta http-equiv="Content-Type" content="text/html; charset=UTF-8" />

Review your parent theme for instances like this that can be easily replaced with static information.

[Back to Top ↑]

Optimize WordPress Database

WordPress database optimization

After using WordPress for a while, your database will have lots of information that you probably don’t need any more. For improved performance, you can optimize your database to get rid of all that unnecessary information.

This can be easily managed with the WP-Sweep plugin. It allows you to clean your WordPress database by deleting things like trashed posts, revisions, unused tags, etc. It will also optimize your database’s structure with just a click.

See our guide on how to optimize and clean up your WordPress database for improved performance.

[Back to Top ↑]

Limit Post Revisions

Revisions in WordPress

Post revisions take up space in your WordPress database. Some users believe that revisions can also affect some database queries run by plugins. If the plugin doesn’t specifically exclude post revisions, it might slow down your site by searching through them unnecessarily.

You can easily limit the number of revisions WordPress keeps for each article. Simply add this line of code to your wp-config.php file.

define( 'WP_POST_REVISIONS', 4 );

This code will limit WordPress to only save your last 4 revisions of each post or page, and discard older revisions automatically.

[Back to Top ↑]

Disable Hotlinking and Leaching of Your Content

Prevent image theft in WordPress

If you’re creating quality content on your WordPress site, then the sad truth is that it’ll probably get stolen sooner or later.

One way this happens is when other websites serve your images directly from their URLs on your website, instead of uploading them to their own servers. In effect, they’re stealing your web hosting bandwidth, and you don’t get any traffic to show for it.

Simply add this code to your .htaccess file to block hotlinking of images from your WordPress site.

#disable hotlinking of images with forbidden or custom image option
RewriteEngine on
RewriteCond %{HTTP_REFERER} !^$
RewriteCond %{HTTP_REFERER} !^http(s)?://(www\.)?wpbeginner.com [NC]
RewriteCond %{HTTP_REFERER} !^http(s)?://(www\.)?google.com [NC]
RewriteRule \.(jpg|jpeg|png|gif)$ – [NC,F,L] 

Note: Don’t forget to change wpbeginner.com with your own domain.

How to Remove the Welcome Panel in WordPress Dashboard

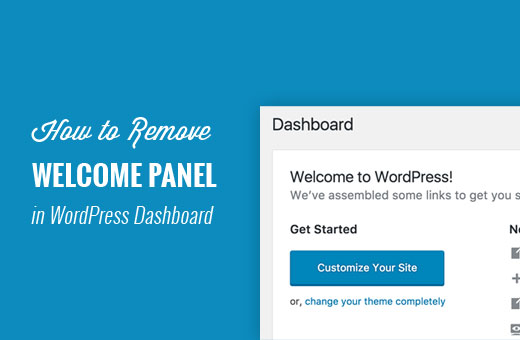
Do you want to remove the welcome panel in your WordPress dashboard? The welcome panel is a box added to the dashboard page of your WordPress admin area. It contains shortcuts to perform different tasks and helps new users find their way around. In this article, we will show you how to remove the welcome panel in WordPress dashboard.

Remove welcome panel in WordPress dashboard

Why Remove Welcome Panel in WordPress?

Welcome panel is a meta box added to the dashboard screen of WordPress admin area. It shows shortcuts to different sections of your WordPress site.

Welcome Panel

The purpose of the welcome panel is to help beginners find their way around WordPress.

However as you become more familiar to all these locations, this panel will become less useful for you.

Having it on the screen, pushes down other important dashboard widgets and make them less noticeable.

Let’s see how you can easily get rid of the welcome panel from your WordPress dashboard screen.

Removing Welcome Panel from WordPress Dashboard

There are multiple ways to hide and even completely remove the welcome panel.

The easiest way to remove it is by simply clicking on the Dismiss button at the top right corner of the panel.

Dismiss welcome panel in WordPress dashboard

You can also remove the welcome panel by clicking on the Screen Options button at the top right corner of the screen.

This will bring a fly down menu. You need to uncheck the checkbox next to ‘Welcome’ option.

Remove welcome panel using Screen Options in WordPress

Both methods mentioned above will hide the welcome panel. You can access it again by clicking on the Screen Options button and checking the box next to Welcome option.

However if you want to completely remove the welcome panel even from the Screen Options, then that’s also possible.

This method requires you to add code to your WordPress site. If you haven’t done this before, then take a look at our guide on pasting snippets from the web into WordPress.

You will need to add this code to your theme’s functions.php file or a site-specific plugin.
1 remove_action('welcome_panel', 'wp_welcome_panel');

This code simply removes the action that adds the welcome panel to the admin dashboard.

You can now visit the dashboard screen and click on the Screen Options menu. You will notice that the welcome panel option will no longer be available.

Welcome panel removed from dashboard and Screen Options menu

That’s all. We hope this article helped you remove the welcome panel in WordPress dashboard.

How to Display Category Descriptions in WordPress

Do you want to display category descriptions on your WordPress site? Categories allow you to easily sort content on your website. They also help users easily find content and are good for SEO. In this article, we will show you how to easily display category descriptions in WordPress.

How to display category description in WordPress

Adding Category Descriptions in WordPress

WordPress comes with two built-in taxonomies called categories and tags. These taxonomies allow you to easily sort your content into different topics.

When used correctly, categories and tags can also be very helpful in improving your WordPress SEO.

WordPress allows you to add descriptions for your categories. However, many users don’t notice it because they create categories when writing a post which doesn’t let them add description.

Here is how to easily add description to your categories.

Head over to Posts » Categories page. If you are creating a new category, then you can simply enter category name and description here and then click on ‘Add new category’ button.

Add category description

If you want to add description to an existing category, then you need to click on the ‘Edit’ link below that category.

This will take you to category edit screen where you can add description for your category.

Editing a category to add description

Don’t forget to click on the ‘Update’ button to save your changes.

Repeat the process to add descriptions to all your categories. You can use the same method to add descriptions for tags as well.

Display Category Description on Category Archive Page

Most WordPress themes will automatically display the category description on the category archive pages.

Category description shown on category archive page in WordPress

However if your theme does not display category description on archive pages, then you will need to edit your theme files.

Connect to your WordPress site using an FTP client and then go to /wp-content/themes/your-current-theme/ folder.

Now you will need to locate and edit category.php file. If your theme doesn’t have category.php file, then you will need to edit archive.php file.

Copy and paste this code where you would like the category description to be displayed.

<?php 
the_archive_description( '
', '
' ); ?>

You can now save your changes and upload the file back to your website.

After that, you can visit the category archive page on your website to see the description in action.

Display Category Description in WordPress Theme

If you want to display the category description in other parts of your website, then you can also use the category_description template tag:

<?php echo category_description(3); ?>

Don’t forget to replace 3 with your own category ID.

If you want to display category description inside a single post, then you can use this code.

$catID = get_the_category();
echo category_description( $catID[0] ); 

This code simply gets all categories for the current post and then outputs the category description of the first category.

If you would like to list all your WordPress categories with a description in list format, then you can add this code in your theme’s functions.php file:

function wpb_catlist_desc() { 
$string = '<ul>';
$catlist = get_terms( 'category' );
if ( ! empty( $catlist ) ) {
  foreach ( $catlist as $key => $item ) {
    $string .= '<li>'. $item->name . '<br />';
    $string .= '<em>'. $item->description . '</em> </li>';
  }
}
$string .= '</ul>';

return $string; 
}
add_shortcode('wpb_categories', 'wpb_catlist_desc');

This code creates a shortcode which displays all your categories and their descriptions in a plain list.

You can now use [wpb_categories] in your posts and pages. To use this shortcode inside a text widget, you will need to enable shortcodes for widgets.

List WordPress categories with description

We hope this article helped you learn how to add and display category descriptions in WordPress.

32 Extremely Useful Tricks for the WordPress Functions File

All WordPress themes come with a powerful functions.php file. This file acts as a plugin and allows you to do lots of cool things on your WordPress site. In this article, we will show you some of the most useful tricks for your WordPress functions file.

Most useful tricks for WordPress functions file

What is Functions File in WordPress?

Functions file commonly known as functions.php file is a WordPress theme file. It comes with all free and premium WordPress themes.

The purpose of this file is to allow theme developers to define theme features and functions. This file acts just like a WordPress plugin and can be used to add your own custom code snippets in WordPress.

You would find many of these code snippets on websites like WPBeginner with instructions telling you to add this code in your theme’s functions.php file or a site-specific WordPress plugin.

Now you may be thinking what’s the difference between a site-specific WordPress plugin and functions.php file? Which one is better?

While functions.php file is more convenient, a site-specific plugin is much better. Simply because it is independent of your WordPress theme and would work regardless of which theme you are using.

On the other hand, a theme’s functions file will only work for that theme and if you switch the theme, then you will have to copy / paste your custom codes into the new theme.

Having said that, here are some extremely useful tricks for the WordPress functions file.

1. Remove WordPress Version Number

You should always use the latest version of WordPress. However, you may still want to remove the WordPress version number from your site. Simply add this code snippet to your functions file.

1 function wpb_remove_version() {
2 return '';
3 }
4 add_filter('the_generator', 'wpb_remove_version');

For detailed instructions, see our guide on the right way to remove WordPress version number.

Want to white label your WordPress admin area? Adding a custom dashboard logo is the first step in the process.

First you’ll need to upload your custom logo to your theme’s images folder as custom-logo.png. Make sure your custom logo is 16×16 pixels in size.

After that you can add this code to your theme’s functions file.

01 function wpb_custom_logo() {
02 echo '
03 <style type="text/css">
04 #wpadminbar #wp-admin-bar-wp-logo > .ab-item .ab-icon:before {
05 background-image: url(' . get_bloginfo('stylesheet_directory') . '/images/custom-logo.png) !important;
06 background-position: 0 0;
07 color:rgba(0, 0, 0, 0);
08 }
09 #wpadminbar #wp-admin-bar-wp-logo.hover > .ab-item .ab-icon {
10 background-position: 0 0;
11 }
12 </style>
13 ';
14 }
15 //hook into the administrative header output
16 add_action('wp_before_admin_bar_render', 'wpb_custom_logo');

For alternate methods and more details see our guide on how to add a custom dashboard logo in WordPress.

3. Change the Footer in WordPress Admin Panel

The footer in WordPress admin area shows the message ‘Thank you for creating with WordPress’. You can change it to anything you want by adding this code.

1 function remove_footer_admin () {
2
3 echo 'Fueled by <a href="http://www.wordpress.org" target="_blank">WordPress</a> | WordPress Tutorials: <a href="http://www.wpbeginner.com" target="_blank">WPBeginner</a></p>';
4
5 }
6
7 add_filter('admin_footer_text', 'remove_footer_admin');

Feel free to change the text and links that you want to add. Here is how it looks on our test site.

Custom footer in WordPress admin area

4. Add Custom Dashboard Widgets in WordPress

You probably have seen widgets that numerous plugins and themes add in the WordPress dashboard. As a theme developer, you can add one yourself by pasting the following code:

01 add_action('wp_dashboard_setup', 'my_custom_dashboard_widgets');
02
03 function my_custom_dashboard_widgets() {
04 global $wp_meta_boxes;
05
06 wp_add_dashboard_widget('custom_help_widget', 'Theme Support', 'custom_dashboard_help');
07 }
08
09 function custom_dashboard_help() {
10 echo '<p>Welcome to Custom Blog Theme! Need help? Contact the developer <a href="mailto:yourusername@gmail.com">here</a>. For WordPress Tutorials visit: <a href="http://www.wpbeginner.com" target="_blank">WPBeginner</a></p>';
11 }

This is how it would look like:

Custom dashboard widget in WordPress

For details, see our tutorial on how to add custom dashboard widgets in WordPress.

5. Change the Default Gravatar in WordPress

Have you seen the default mystery man avatar on blogs? You can easily replace it with your own branded custom avatars. Simply upload the image you want to use as default avatar and then add this code to your functions file.

1 add_filter( 'avatar_defaults', 'wpb_new_gravatar' );
2 function wpb_new_gravatar ($avatar_defaults) {
3 $myavatar = 'http://example.com/wp-content/uploads/2017/01/wpb-default-gravatar.png';
4 $avatar_defaults[$myavatar] = "Default Gravatar";
5 return $avatar_defaults;
6 }

Now you can head over to Settings » Discussion page and select your default avatar.
Custom default gravatar

For detailed instructions, see our guide on how to change the default gravatar in WordPress.

6. Dynamic Copyright Date in WordPress Footer

You can simply add copyright date by editing the footer template in your theme. However, it will not show when your site started and it will not automatically change next year.

You can use this code to add a dynamic copyright date in WordPress footer.

01 function wpb_copyright() {
02 global $wpdb;
03 $copyright_dates = $wpdb->get_results("
04 SELECT
05 YEAR(min(post_date_gmt)) AS firstdate,
06 YEAR(max(post_date_gmt)) AS lastdate
07 FROM
08 $wpdb->posts
09 WHERE
10 post_status = 'publish'
11 ");
12 $output = '';
13 if($copyright_dates) {
14 $copyright = "© " . $copyright_dates[0]->firstdate;
15 if($copyright_dates[0]->firstdate != $copyright_dates[0]->lastdate) {
16 $copyright .= '-' . $copyright_dates[0]->lastdate;
17 }
18 $output = $copyright;
19 }
20 return $output;
21 }

After adding this function, you’ll need to open your footer.php file and add the following code wherever you like to display the dynamic copyright date:

1 <?php echo wpb_copyright(); ?>

This function looks for the date of your first post, and the date of your last post. It then echos the years wherever you call the function.

For more details, see our guide on how to add dynamic copyright date in WordPress.

7. Randomly Change Background Color in WordPress

Do you want to randomly change background color on your WordPress upon each visit and page reload? Here is how to easily do this.

First you need to add this code to your theme’s functions file.

1 function wpb_bg() {
2 $rand = array('0', '1', '2', '3', '4', '5', '6', '7', '8', '9', 'a', 'b', 'c', 'd', 'e', 'f');
3 $color ='#'.$rand[rand(0,15)].$rand[rand(0,15)].$rand[rand(0,15)].
4 $rand[rand(0,15)].$rand[rand(0,15)].$rand[rand(0,15)];
5 echo $color;
6 }

Next, you’ll need to edit the header.php file in your theme. Locate the <body> tag and add replace it with this line:

1 <body <?php body_class(); ?> style="background-color:<?php wpb_bg();?>">>

You can now save your changes and visit your website to see this in action.

Random background change in WordPress

For more details and alternate methods, see our tutorial on how to randomly change background color in WordPress.

8. Update WordPress URLs

If your WordPress login page keeps refreshing or you are unable to access admin area, then you need to update WordPress URLs.

One way to do this is by using wp-config.php file. However, if you do that you will not be able to set the correct address on the settings page. The WordPress URL and Site URL fields will be locked and uneditable.

If you want to fix this, then you should add this code to your functions file.

1 update_option( 'siteurl', 'http://example.com' );
2 update_option( 'home', 'http://example.com' );

Don’t forget to replace example.com with your own domain name.

Once you are logged in, you can go to Settings and set the URLs there. After that you should remove the code you added to the functions file, otherwise it will keep updating those URLs any time your site is accessed.

9. Add Additional Image Sizes in WordPress

WordPress automatically creates several image sizes when you upload an image. You can also create additional image sizes to use in your theme. Add this code your theme’s functions file.

1 add_image_size( 'sidebar-thumb', 120, 120, true ); // Hard Crop Mode
2 add_image_size( 'homepage-thumb', 220, 180 ); // Soft Crop Mode
3 add_image_size( 'singlepost-thumb', 590, 9999 ); // Unlimited Height Mode

This code creates three new image sizes with different sizes. Feel free to tweak the code to meet your own requirements.

You can display an image size in anywhere in your theme using this code.

1 <?php the_post_thumbnail( 'homepage-thumb' ); ?>

For detailed instructions, see our guide on how to create additional image sizes in WordPress.

10. Add New Navigation Menus to Your Theme

WordPress allows theme developers to define navigation menus and then display them. Add this code in your theme’s functions file to define a new menu location in your theme.

1 function wpb_custom_new_menu() {
2   register_nav_menu('my-custom-menu',__( 'My Custom Menu' ));
3 }
4 add_action( 'init', 'wpb_custom_new_menu' );

You can now go to Appearance » Menus and you will see ‘My Custom Menu’ as theme location option.

New navigation menu

Now you need to add this code to your theme where you want to display navigation menu.

1 <?php
2 wp_nav_menu( array(
3     'theme_location' => 'my-custom-menu',
4     'container_class' => 'custom-menu-class' ) );
5 ?>

For detailed instructions, see our guide on how to add custom navigation menus in WordPress themes.

11. Add Author Profile Fields

Do you want to add extra fields to your author profiles in WordPress? You can easily do that by adding this code to your functions file:

1 function wpb_new_contactmethods( $contactmethods ) {
2 // Add Twitter
3 $contactmethods['twitter'] = 'Twitter';
4 //add Facebook
5 $contactmethods['facebook'] = 'Facebook';
6
7 return $contactmethods;
8 }
9 add_filter('user_contactmethods','wpb_new_contactmethods',10,1);

This code will add Twitter and Facebook fields to user profiles in WordPress.

Extra user profile fields in WordPress

You can now display these fields in your author template like this:

1 <?php echo $curauth->twitter; ?>

You may also want to see our guide on how to add additional user profile fields in WordPress registration.

12. Adding Widget Ready Areas or Sidebar in WordPress Themes

This is one of the most used ones and many developers already know about this. But it deserves to be in this list for those who don’t know. Paste the following code in your functions.php file:

01 // Register Sidebars
02 function custom_sidebars() {
03
04     $args = array(
05         'id'            => 'custom_sidebar',
06         'name'          => __( 'Custom Widget Area', 'text_domain' ),
07         'description'   => __( 'A custom widget area', 'text_domain' ),
08         'before_title'  => '<h3 class="widget-title">',
09         'after_title'   => '</h3>',
10         'before_widget' => '<aside id="%1$s" class="widget %2$s">',
11         'after_widget'  => '</aside>',
12     );
13     register_sidebar( $args );
14
15 }
16 add_action( 'widgets_init', 'custom_sidebars' );

You can now visit Appearance » Widgets page and you will see your new custom widget area.

Newly registered widget area in WordPress

To display this sidebar or widget ready area in your theme add this code:

1 <?php if ( !function_exists('dynamic_sidebar') || !dynamic_sidebar('custom_sidebar') ) : ?>
2 <!–Default sidebar info goes here–>
3 <?php endif; ?>

For more details see our guide on how to add dynamic widget ready areas and sidebars in WordPress.

13. Manipulate RSS Feed Footer

Have you seen blogs that adds their advertisement in their RSS Feeds below each post. You can accomplish that easily with a simple function. Paste the following code:

1 function wpbeginner_postrss($content) {
2 if(is_feed()){
3 $content = 'This post was written by Syed Balkhi '.$content.'Check out WPBeginner';
4 }
5 return $content;
6 }
7 add_filter('the_excerpt_rss', 'wpbeginner_postrss');
8 add_filter('the_content', 'wpbeginner_postrss');

For more information, see our guide on how to add content and completely manipulate your RSS feeds.

14. Add Featured Images to RSS Feeds

The post thumbnail or featured images are usually only displayed within your site design. You can easily extend that functionality to your RSS feed with a simple function in your RSS feed.

01 function rss_post_thumbnail($content) {
02 global $post;
03 if(has_post_thumbnail($post->ID)) {
04 $content = '<p>' . get_the_post_thumbnail($post->ID) .
05 '</p>' . get_the_content();
06 }
07 return $content;
08 }
09 add_filter('the_excerpt_rss', 'rss_post_thumbnail');
10 add_filter('the_content_feed', 'rss_post_thumbnail');

For more details see our guide on how to add post thumbnails to your WordPress RSS feed.

15. Hide Login Errors in WordPress

Login errors in WordPress can be used by hackers to guess whether they entered wrong username or password. By hiding login errors in WordPress you can make your login area a bit more secure.

1 function no_wordpress_errors(){
2   return 'Something is wrong!';
3 }
4 add_filter( 'login_errors', 'no_wordpress_errors' );

Now users see a generic message when they enter incorrect username or password.

No login hints in WordPress

For more information, see our tutorial on how to disable login hints in WordPress login error messages.

16. Disable Login by Email in WordPress

WordPress allows users to login with username or email address. You can easily disable login by email in WordPress by adding this code to your functions file.

1 remove_filter( 'authenticate', 'wp_authenticate_email_password', 20 );

For more information see our guide on how to disable login by email feature in WordPress.

17. Disable Search Feature in WordPress

If you want to disable search feature on your WordPress site, then simply add this code to your functions file.

01 function fb_filter_query( $query, $error = true ) {
02
03 if ( is_search() ) {
04 $query->is_search = false;
05 $query->query_vars[s] = false;
06 $query->query[s] = false;
07
08 // to error
09 if ( $error == true )
10 $query->is_404 = true;
11 }
12 }
13
14 add_action( 'parse_query', 'fb_filter_query' );
15 add_filter( 'get_search_form', create_function( '$a', "return null;" ) );

For more information, see our tutorial on how to disable search feature in WordPress.

18. Delay Posts in RSS Feed

Sometimes you may end up with a grammar or spelling mistake in your article. The mistake goes live and is distributed to your RSS feed subscribers. If you have email subscriptions on your WordPress blog, then those subscribers will get it as well.

Simply add this code in your theme’s functions file.

01 function publish_later_on_feed($where) {
02
03     global $wpdb;
04
05     if ( is_feed() ) {
06         // timestamp in WP-format
07         $now = gmdate('Y-m-d H:i:s');
08
09         // value for wait; + device
10         $wait = '10'; // integer
11
12         // http://dev.mysql.com/doc/refman/5.0/en/date-and-time-functions.html#function_timestampdiff
13         $device = 'MINUTE'; //MINUTE, HOUR, DAY, WEEK, MONTH, YEAR
14
15         // add SQL-sytax to default $where
16         $where .= " AND TIMESTAMPDIFF($device, $wpdb->posts.post_date_gmt, '$now') > $wait ";
17     }
18     return $where;
19 }
20
21 add_filter('posts_where', 'publish_later_on_feed');

In this code we have used 10 minutes as $wait or delay time. Feel free to change that into any number of minutes you want.

For plugin method and more information, see our detailed guide on how to delay posts from appearing in WordPress RSS feed.

19. Change Read More Text for Excerpts in WordPress

Do you want to change the text that appears after the excerpt? Simply add this code to your theme’s functions file.

1 function modify_read_more_link() {
2     return '<a class="more-link" href="' . get_permalink() . '">Your Read More Link Text</a>';
3 }
4 add_filter( 'the_content_more_link', 'modify_read_more_link' );

20. Disable RSS Feeds in WordPress

Not all websites need RSS feeds. If you want to disable RSS feeds on your WordPress site, then add this code to your theme’s functions file.

1 function fb_disable_feed() {
2 wp_die( __('No feed available,please visit our <a href="'. get_bloginfo('url') .'">homepage</a>!') );
3 }
4
5 add_action('do_feed', 'fb_disable_feed', 1);
6 add_action('do_feed_rdf', 'fb_disable_feed', 1);
7 add_action('do_feed_rss', 'fb_disable_feed', 1);
8 add_action('do_feed_rss2', 'fb_disable_feed', 1);
9 add_action('do_feed_atom', 'fb_disable_feed', 1);

For a plugin method and more information, see our guide on how to disable RSS feeds in WordPress.

21. Change Excerpt Length in WordPress

WordPress limits excerpt lengths to 55 words. If you need to change that, then you can add this code to your functions file.

1 functionnew_excerpt_length($length) {
2 return 100;
3 }
4 add_filter('excerpt_length', 'new_excerpt_length');

Change 100 to the number of words you want to show in the excerpts.

For alternate method, you may want to take a look at our guide on how to customize WordPress excerpts (no coding required).

22. Add an Admin User in WordPress

If you have forgotten your WordPress password and email, then you can add an admin user by adding this code to your theme’s functions file using an FTP client.

01 function wpb_admin_account(){
02 $user = 'Username';
03 $pass = 'Password';
04 $email = 'email@domain.com';
05 if ( !username_exists( $user )  && !email_exists( $email ) ) {
06 $user_id = wp_create_user( $user, $pass, $email );
07 $user = new WP_User( $user_id );
08 $user->set_role( 'administrator' );
09 } }
10 add_action('init','wpb_admin_account');

Don’t forget to fill in the username, password, and email fields. Once you login to your WordPress site, don’t forget to delete the code from your functions file.

For more on this topic, take a look at our tutorial on how to add an admin user in WordPress using FTP.

23. Remove Welcome Panel from WordPress Dashboard

Welcome panel is a meta box added to the dashboard screen of WordPress admin area. It provides useful shortcuts for beginners to do things on their new WordPress site.

Welcome panel in WordPress admin dashboard

You can easily hide by adding this code in your functions file.

1 remove_action('welcome_panel', 'wp_welcome_panel');

For other methods and more details check out our guide on how to remove welcome panel in WordPress dashboard.

24. Show Total Number of Registered Users in WordPress

Do you want to show total number of registered users on your WordPress site? Simply add this code to your theme’s functions file.

1 // Function to return user count
2 function wpb_user_count() {
3 $usercount = count_users();
4 $result = $usercount['total_users'];
5 return $result;
6 }
7 // Creating a shortcode to display user count
8 add_shortcode('user_count', 'wpb_user_count');

This code creates a shortcode that allows you to display total number of registered users on your site. Now you just need to add this shortcode to [user_count] your post or page where you want to show the total number of users.

For more information and a plugin method, see our tutorial on how to display total number of registered users in WordPress.

25. Exclude Specific Categories from RSS Feed

Do you want to exclude specific categories from your WordPress RSS feed? Add this code to your theme’s functions file.

1 function exclude_category($query) {
2     if ( $query->is_feed ) {
3         $query->set('cat', '-5, -2, -3');
4     }
5 return $query;
6 }
7 add_filter('pre_get_posts', 'exclude_category');

26. Enable Shortcode Execution in Text Widgets

By default, WordPress does not execute shortcodes inside text widgets. To fix this you need to simply add this code to your theme’s functions file.

1 // Enable shortcodes in text widgets
2 add_filter('widget_text','do_shortcode');

For an alternate method and more information, take a look at our guide on how to use shortcodes in WordPress sidebar widgets.

27. Add Odd and Even CSS Classes to WordPress Posts

You may have seen WordPress themes using an old or even class for WordPress comments. It helps users visualize where one comment ends and the next one begins.

You can use the same technique for your WordPress posts. It looks aesthetically pleasing and helps users quickly scan pages with lots of content. Simply add this code to your theme’s functions file.

1 function oddeven_post_class ( $classes ) {
2    global $current_class;
3    $classes[] = $current_class;
4    $current_class = ($current_class == 'odd') ? 'even' : 'odd';
5    return $classes;
6 }
7 add_filter ( 'post_class' , 'oddeven_post_class' );
8 global $current_class;
9 $current_class = 'odd';

This code simply adds an odd or even class to WordPress posts. You can now add custom CSS to style them differently. Here is a sample code to help you get started.

1 .even {
2 background:#f0f8ff
3 }
4 .odd {
5  background:#f4f4fb;
6 }

The end result will look something like this:

Alternate colors used for WordPress posts using odd and even CSS classes

Need more detailed instructions? Take a look at our tutorial on how to add odd/even class to your post in WordPress themes.

28. Add Additional File Types to be Uploaded in WordPress

By default, WordPress allows you to upload a limited number of most commonly used file types. However, you can extend it to allow other file types. Add this code to your theme’s functions file:

1 function my_myme_types($mime_types){
2     $mime_types['svg'] = 'image/svg+xml'; //Adding svg extension
3     $mime_types['psd'] = 'image/vnd.adobe.photoshop'; //Adding photoshop files
4     return $mime_types;
5 }
6 add_filter('upload_mimes', 'my_myme_types', 1, 1);

This code allows you to upload SVG and PSD files to WordPress. You will need to Google to find out the mime types for the file types you want to allow and then use it in the code.

For more on this topic, check out our tutorial on how to add additional file types to be uploaded in WordPress.

By default, when you uplaod an image in WordPress it is automatically linked to the image file or the attachment page. If users click on the image they are then taken to a new page away from your post.

Here is how you can easily stop WordPress from automatically linking image uploads. All you have to do is to add this code snippet to your functions file:

1 function wpb_imagelink_setup() {
2     $image_set = get_option( 'image_default_link_type' );
3     
4     if ($image_set !== 'none') {
5         update_option('image_default_link_type', 'none');
6     }
7 }
8 add_action('admin_init', 'wpb_imagelink_setup', 10);

Now when you upload a new image in WordPress, it will not be automatically linked. You can still link it to the file or attachment page if you want.

Disable default image links in WordPress

You may want to check out our tutorial on how to remove default image links in WordPress for an alternate plugin method and more information.

30. Add an Author Info Box in WordPress Posts

If you run a multi-author site and want to showcase author bios at the end of your post, then you can try this method. Start by adding this code to your functions file:

01 function wpb_author_info_box( $content ) {
02
03 global $post;
04
05 // Detect if it is a single post with a post author
06 if ( is_single() && isset( $post->post_author ) ) {
07
08 // Get author's display name
09 $display_name = get_the_author_meta( 'display_name', $post->post_author );
10
11 // If display name is not available then use nickname as display name
12 if ( empty( $display_name ) )
13 $display_name = get_the_author_meta( 'nickname', $post->post_author );
14
15 // Get author's biographical information or description
16 $user_description = get_the_author_meta( 'user_description', $post->post_author );
17
18 // Get author's website URL
19 $user_website = get_the_author_meta('url', $post->post_author);
20
21 // Get link to the author archive page
22 $user_posts = get_author_posts_url( get_the_author_meta( 'ID' , $post->post_author));
23  
24 if ( ! empty( $display_name ) )
25
26 $author_details = '<p class="author_name">About ' . $display_name . '</p>';
27
28 if ( ! empty( $user_description ) )
29 // Author avatar and bio
30
31 $author_details .= '<p class="author_details">' . get_avatar( get_the_author_meta('user_email') , 90 ) . nl2br( $user_description ). '</p>';
32
33 $author_details .= '<p class="author_links"><a href="'. $user_posts .'">View all posts by ' . $display_name . '</a>'
34
35 // Check if author has a website in their profile
36 if ( ! empty( $user_website ) ) {
37
38 // Display author website link
39 $author_details .= ' | <a href="' . $user_website .'" target="_blank" rel="nofollow">Website</a></p>';
40
41 } else {
42 // if there is no author website then just close the paragraph
43 $author_details .= '</p>';
44 }
45
46 // Pass all this info to post content 
47 $content = $content . '<footer class="author_bio_section" >' . $author_details . '</footer>';
48 }
49 return $content;
50 }
51
52 // Add our function to the post content filter
53 add_action( 'the_content', 'wpb_author_info_box' );
54
55 // Allow HTML in author bio section
56 remove_filter('pre_user_description', 'wp_filter_kses');

Next you will need to add some custom CSS to make it look better. You can use this sample CSS as an starting point.

01 .author_bio_section{
02 background: none repeat scroll 0 0 #F5F5F5;
03 padding: 15px;
04 border: 1px solid #ccc;
05 }
06
07 .author_name{
08 font-size:16px;
09 font-weight: bold;
10 }
11
12 .author_details img {
13 border: 1px solid #D8D8D8;
14 border-radius: 50%;
15 float: left;
16 margin: 0 10px 10px 0;
17 }

This is how your author box would look like:

Author box

For plugin method and more detailed instructions, check out our article on how to add an author info box in WordPress posts.

31. Disable XML-RPC in WordPress

XML-RPC is a method that allows third party apps to communicate with your WordPress site remotely. This could cause security issues and can be exploited by hackers.

Simply add this code to your functions file to turn off XML-RPC in WordPress:

1 add_filter('xmlrpc_enabled', '__return_false');

You may want to read our article on how to disable XML-RPC in WordPress for more information.

32. Automatically Link Featured Images to Posts

If your WordPress theme does not automatically link featured images to full articles, then you can try this method. Simply add this code to your theme’s functions file.

01 function wpb_autolink_featured_images( $html, $post_id, $post_image_id ) {
02
03 If (! is_singular()) {
04     
05 $html = '<a href="' . get_permalink( $post_id ) . '" title="' . esc_attr( get_the_title( $post_id ) ) . '">' . $html . '</a>';
06 return $html;
07
08 } else {
09
10 return $html;
11
12 }
13
14 }
15 add_filter( 'post_thumbnail_html', 'wpb_autolink_featured_images', 10, 3 );

You may want to read our article on how to automatically link featured images to posts in WordPress.

That’s all for now.

We hope this article helped you learn some new useful tricks for functions.php file in WordPress.

How to Display the Total Number of Comments in WordPress

Do you want to show total number of comments on your WordPress site? Comments allow users to participate and engage with content on your WordPress site. By showing off your total comment count, you can encourage more users to join the conversation. In this article, we will show you how to easily display total number of comments in WordPress.

How to display total number of comments in WordPress

Method 1. Display WordPress Comment Count with a Plugin

This method is easier and is recommended for all users.

First thing you need to do is install and activate the Simple Blog Stats plugin. For more details, see our step by step guide on how to install a WordPress plugin.

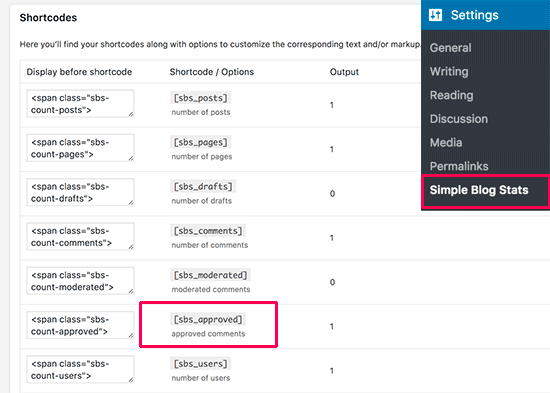
Upon activation, you need to visit Settings » Simple Blog Stats page to configure plugin settings.

Simple Blog Stats settings

The plugin allows you to show your blog stats using shortcodes and template tags.

On this page you will see all the shortcodes that you can use to show different stats like total number of comments, registered users, categories, tags, and much more.

You need to copy the shortcode [sbs_approved] to display the total number of approved comments on your WordPress site.

You can use this shortcode in any WordPress post, page, or text widget. If the shortcode does not work in the text widget, then please see our guide on how to use shortcode in WordPress sidebar widgets.

Method 2. Display WordPress Comment Count with Code

This method requires you to add code to your WordPress files. If you haven’t done this before, then please check out our guide on how to copy paste code in WordPress.

First, you will need to add this code to your theme’s functions.php file or a site-specific plugin.

01 function wpb_comment_count() {
02
03 $comments_count = wp_count_comments();
04 $message 'There are <strong>'$comments_count->approved . '</strong> comments posted by our users.';
05
06 return $message;
07
08 }
09
10 add_shortcode('wpb_total_comments','wpb_comment_count');
11 add_filter('widget_text','do_shortcode');

This code simply creates a function that outputs total number of approved WordPress comments on your site. It then creates a shortcode to display it. You can customize the output message as needed.

Next, you can use the shortcode [wpb_total_comments] in your WordPress posts, pages, or text widget to display total number of comments on your site.

This is how it looked on our demo site.

Preview of comment numbers

We hope this article helped you display total number of comments on your WordPress site.

How to Display the Last Updated Date of Your Posts in WordPress

Do you want to display last updated date for your posts in WordPress? Some websites regularly update their posts and would like to show users when the article was last updated. In this article, we will show you how to easily display the last updated date of your posts in WordPress.

How to display last updated date of your posts in WordPress

When You Need Last Updated Date for Posts in WordPress?

Most WordPress themes usually show the date when a post was last published. This is fine for most blogs and static websites.

However, WordPress is also used by websites where old articles are regularly updated (like ours). This last updated date and time is important information for those publications.

The most common example is news websites. They often update old stories to show new developments, add corrections, or media files. If they only added the published date, then their users would miss those updates.

Many popular blogs and websites don’t show any date on their articles. This is a bad practice and you should never remove dates from your blog posts.

Having said that, let’s see how to easily display last updated date for your posts in WordPress.

Displaying Last Updated Date in WordPress

This tutorial requires you to add code to your WordPress files. If you haven’t done this before, then we recommend you to look at our guide on how to copy paste code in WordPress.

Method 1: Show Last Updated Date Before Post Content

You will need to add this code to your theme’s functions.php file or a site-specific plugin.

01 function wpb_last_updated_date( $content ) {
02 $u_time = get_the_time('U');
03 $u_modified_time = get_the_modified_time('U');
04 if ($u_modified_time >= $u_time + 86400) {
05 $updated_date = get_the_modified_time('F jS, Y');
06 $updated_time = get_the_modified_time('h:i a');
07 $custom_content .= '<p class="last-updated">Last updated on '. $updated_date . ' at '. $updated_time .'</p>'
08 }
09
10     $custom_content .= $content;
11     return $custom_content;
12 }
13 add_filter( 'the_content', 'wpb_last_updated_date' );

This code checks to see if a post’s published date and last modified dates are different. If they are, then it displays last modified date before the post content.

You can add custom CSS to style the appearance of the last updated date. Here is a little CSS that you can use as starting point:

1 .last-updated {
2     font-size: small;
3     text-transform: uppercase;
4     background-color: #fffdd4;
5 }

This is how it looked on our demo website.

Last updated date in post content

Method 2: Add Last Updated Date in Theme Templates

This method requires you to edit specific WordPress theme files. Many WordPress themes now use their own template tags which define how these themes show post meta data like date and time.

Some themes also use content templates or template parts to display posts.

Few simpler themes will use single.php, archive.php, and other template files to show content and meta information.

You will be looking for the code responsible for displaying the date and time. You can then either replace that code with the following code, or add it right after your theme’s date and time code.

1 $u_time = get_the_time('U');
2 $u_modified_time = get_the_modified_time('U');
3 if ($u_modified_time >= $u_time + 86400) {
4 echo "<p>Last modified on ";
5 the_modified_time('F jS, Y');
6 echo " at ";
7 the_modified_time();
8 echo "</p> "; }

This is how it looked on our demo site:

Last updated date in post meta

We hope this article helped you learn how to display last updated date of your posts in WordPress.

How to display last updated date of your posts in WordPress


How to Add Random Header Images to Your WordPress Blog

Do you want to add random header images to your WordPress blog? Most WordPress themes come with built-in support to add header images. These images can completely change your site’s look and feel. In this article, we will show you to how to add random header images to your WordPress blog without writing any code.

Most free and premium WordPress themes come with custom header support. Custom headers in WordPress are a theme feature which allows WordPress themes to designate a header area showing an image.

Custom header is different than background image feature which allows you to set a cutom
background image on your WordPress site.

Having said that let’s take a look at how to add random header images to your WordPress blog.

Method 1. Random Header Images Using WordPress Theme Customizer

This method is easier and is recommended for most WordPress users.

You need to head over to Appearance » Customize page to launch WordPress theme customizer.

Next, you need to click on ‘Header’ tab to expand it. The header option can also be labeled as header image or header media in your theme.

You will see your site’s current header image,
and any other header images available to use.

You need to click on the ‘Add image’ button to upload the images you want to use as header images.

Once you have uploaded a few images, they will appear under recently uploaded images.

Now you need to click on ‘Randomize uploaded header’ button under recently uploaded images and then save your changes.

You can now visit your website and reload it to see header images change randomly.

Method 2. Add Custom Header Images on Select Pages Using Plugin

This method is more flexible and gives you more control on how to show different or random header images for WordPress posts, pages, category, or tag archives.

First thing you need to do is install and activate the WP Display Header plugin.

Upon activation, you need to edit a post or create a new one. You will notice a new meta box labeled‘Header’ below the post editor.

Here you can select a previously uploaded header image to your theme and use it as a header for this post. You can also check the ‘Random’ option to randomly display a background image from your uploaded header images.

If you want to add more header images, then head over to Appearance » Customize and click on the Header tab.

Next, you need to click on the ‘Add image’
button to upload more header images. You don’t need to change the header of your theme just upload the images and exit the customizer.

The plugin also allows you to change header image for your category and tag archive pages.

You will need to go to Posts » Categories page and then click on the Edit button below category you want to change.

On the category edit screen, you will notice the new header section where you can select a header
image or show random header images.

Don’t forget to click on the ‘Update’ button to save your changes. That’s all, we hope this article helped you learn how to easily add random header images to your WordPress blog. ou may also want to see our guide on how to How to Add Title Attribute in WordPress Navigation Menus

For website beginners tutorial, magazines, computer tricks, recharge tricks, freebrowsing tricks, magazines, exam bodies news like NECO & WAEC updates, etc.